
Welcome. This guide walks you through everything you need to do once — in the order that makes the most sense — so your families can start booking sessions as fast as possible. Skim the headings, jump to whatever you need.
If you ever get stuck, every page in LevLUp has small help icons next to the tools — tap one for a quick explanation.
What LevLUp does for you, in 60 seconds
You publish your weekly schedule. Your families see only the times you want them to see, book themselves in, and get email confirmations + calendar invites automatically. You manage who's allowed to book (your client list), which sessions you offer, and how much they cost. Payment runs through Venmo or Zelle on your existing account — LevLUp tracks who paid and who didn't.
You don't have to send a single "we have a 5pm open tomorrow" text again.
Your first 30 minutes (in order)
Doing these five things, in this order, gets you to the point where families can start booking.
1. Check your timezone + set your working hours
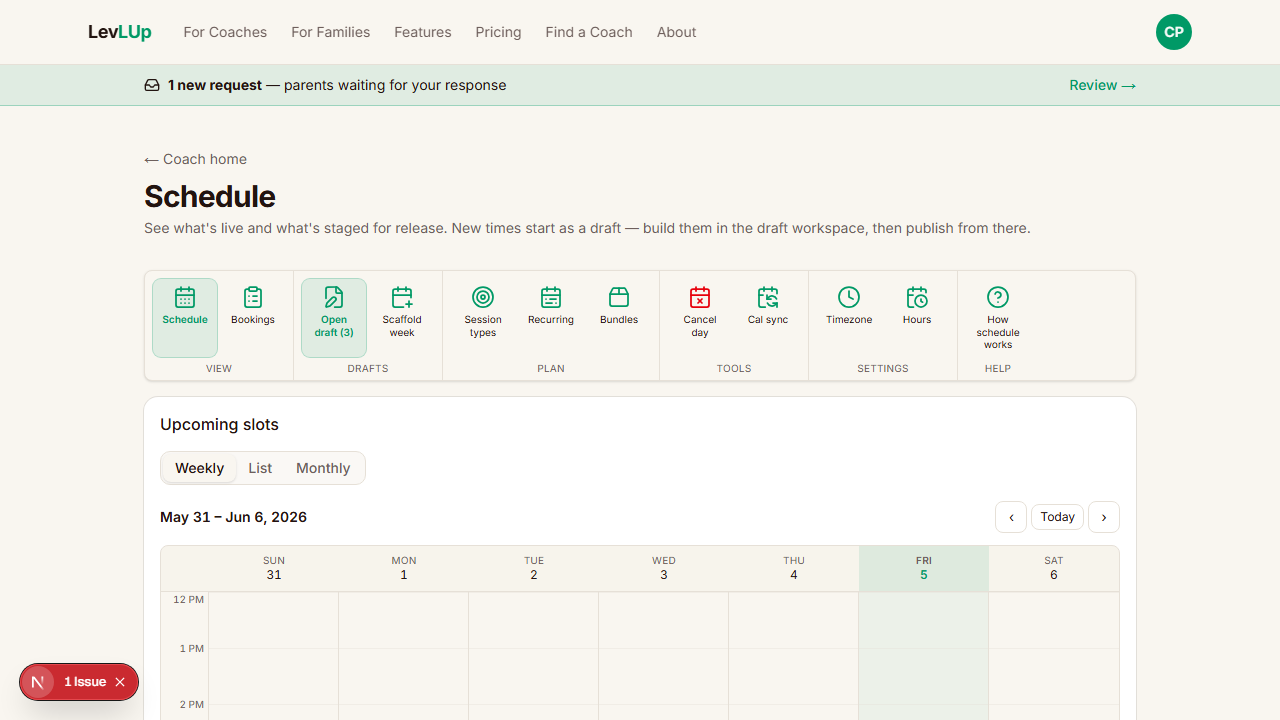
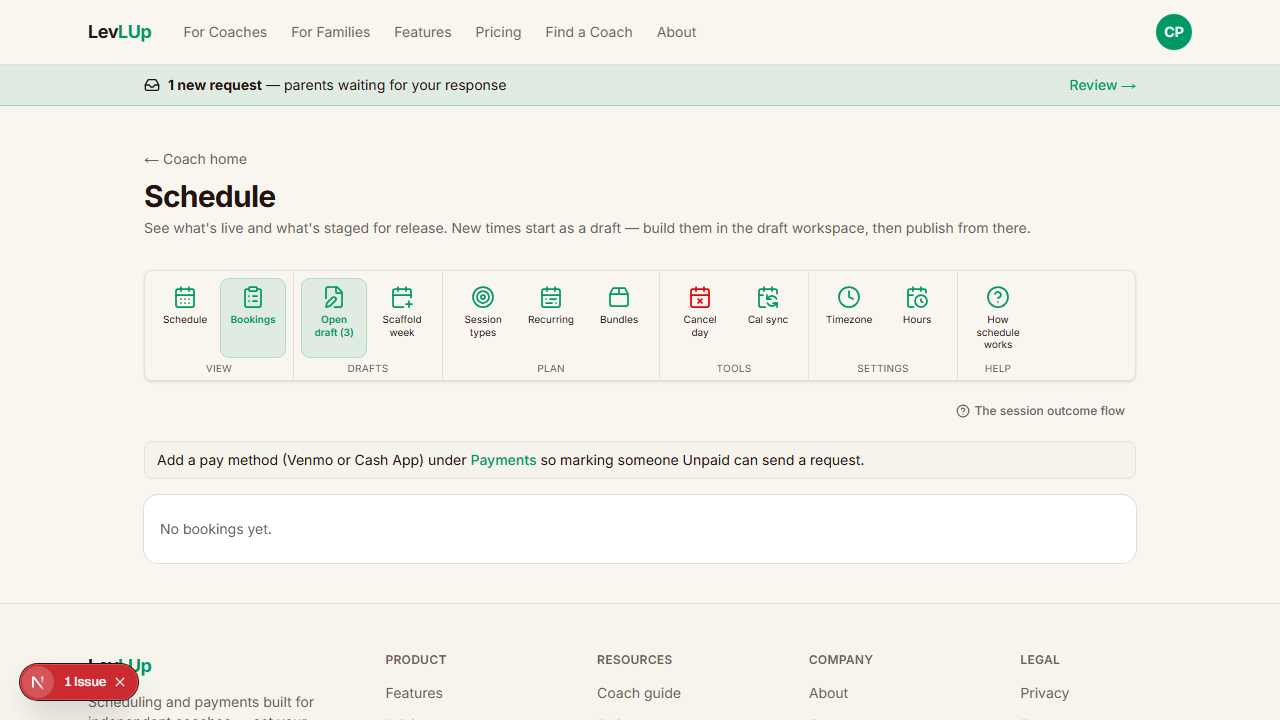
From your coach home, click Schedule at the top.
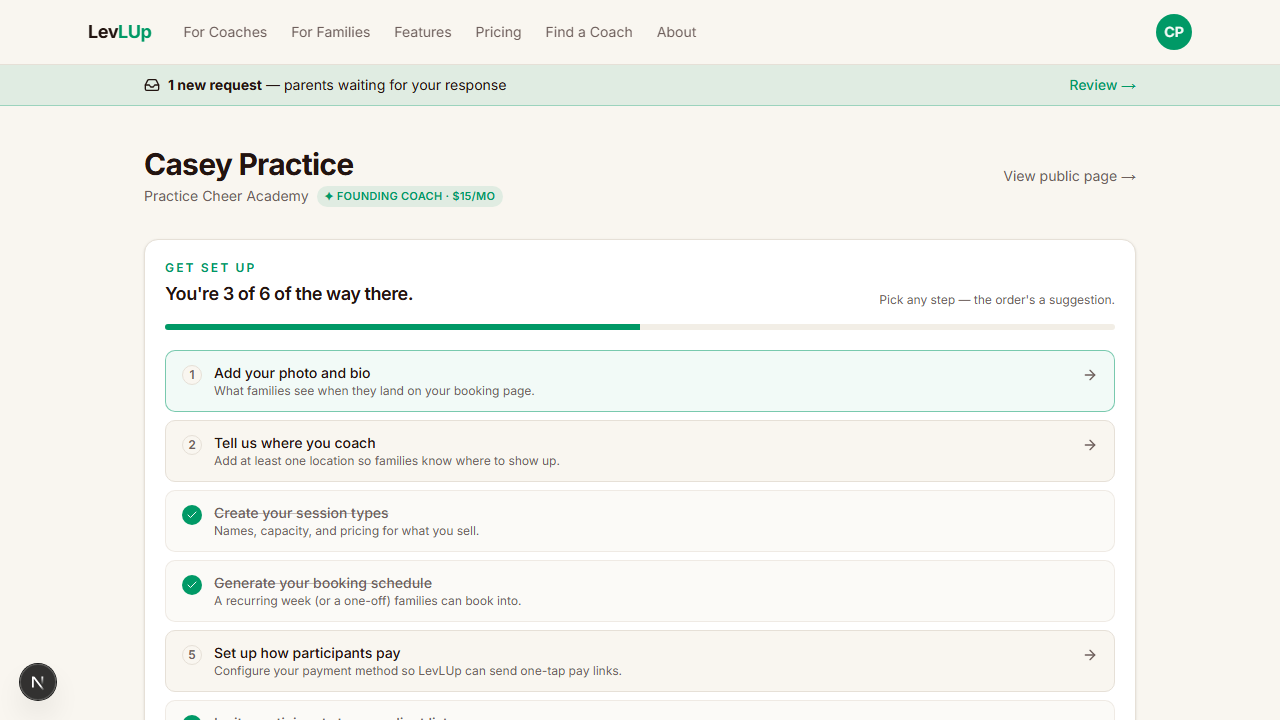
On the Schedule page, find the tool ribbon at the top. The two tools that matter first are:
- Timezone — make sure it shows the right time zone. Every time on your calendar saves and displays in this zone. Get this right before you build any slots.
- Hours — set the band of hours you typically coach (e.g. 12 PM – 9 PM). This is what the weekly calendar focuses on. You can still create sessions outside these hours; the visible band just defaults to where most of your work happens.

2. Build your session types
Still on Schedule, click Session types in the ribbon.
A session type is anything you offer — a 30-minute private, a tumbling clinic, a stretch session. Each one has:
- A name
- A length (in minutes)
- A maximum number of athletes (1 for private, 4 for a clinic, etc.)
- A price (or a pricing strategy that adjusts with how many athletes book in)
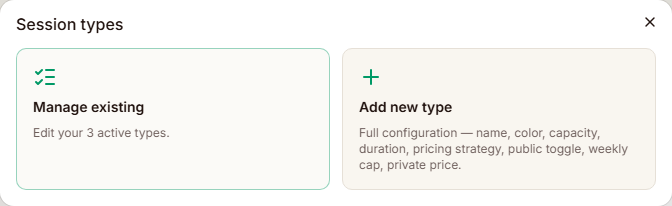
Why this matters first: every slot you put on your schedule has to be tied to a session type. Build them once and you'll reuse them forever.
You can edit prices later; if you change a price, existing bookings keep the price they were quoted, so nobody gets surprised.
3. Scaffold your first week
Click Scaffold week in the ribbon. This is the fastest way to fill out a normal week.
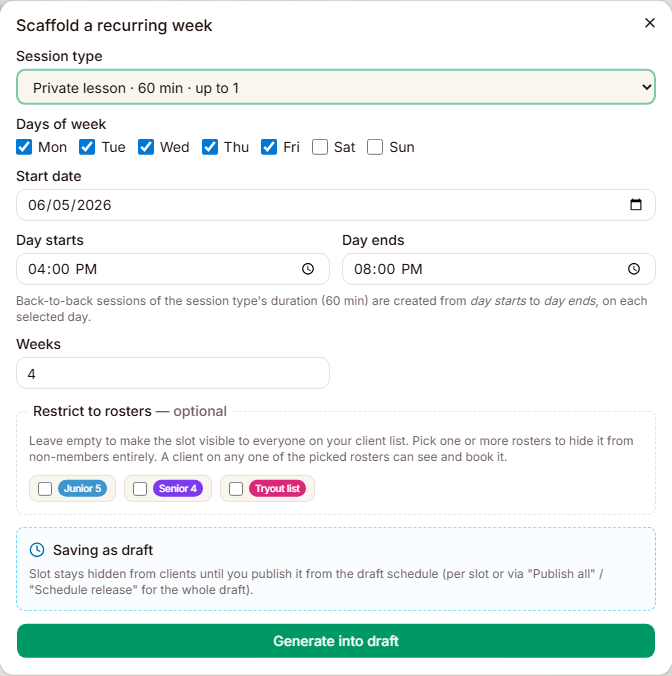
Pick the day, the start/end times, the session type, and how many weeks to repeat. LevLUp creates drafts for every slot — nothing is visible to your families yet. That's intentional: build the whole week, look it over, then publish in one click.
You can also click any empty cell on the weekly calendar to create a single draft slot.
4. Publish your drafts
Open Drafts from the ribbon (or click Open draft if you see a number next to it).
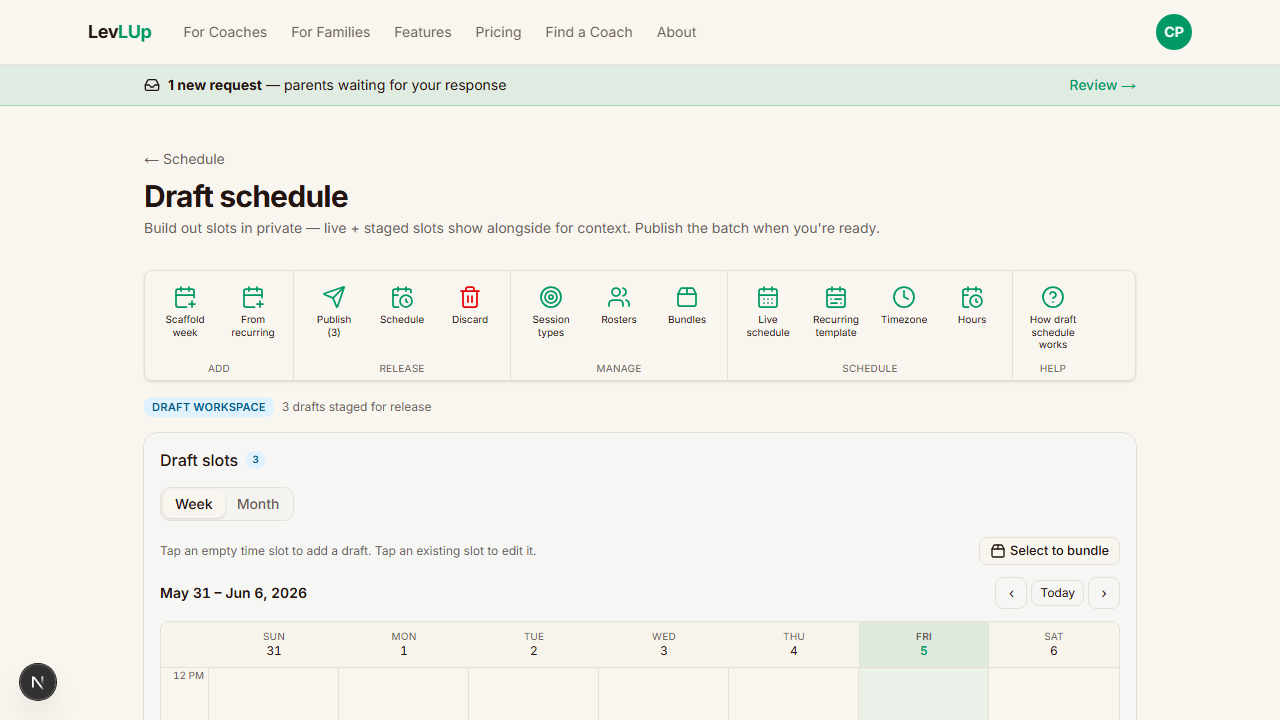
You have three options:
- Publish all now — slots go live immediately and families can book them
- Schedule release — pick a date/time when the slots should go live (good if you want to announce a week opens on Sunday at 6 PM)
- Discard — throw the drafts away
Tip: publishing a release for the same time every week ("Mondays at 6 PM") trains your families to check then. Far less back-and-forth.
5. Add your first client
Without families on your client list, nobody can book.
Click Coach home → Client list.
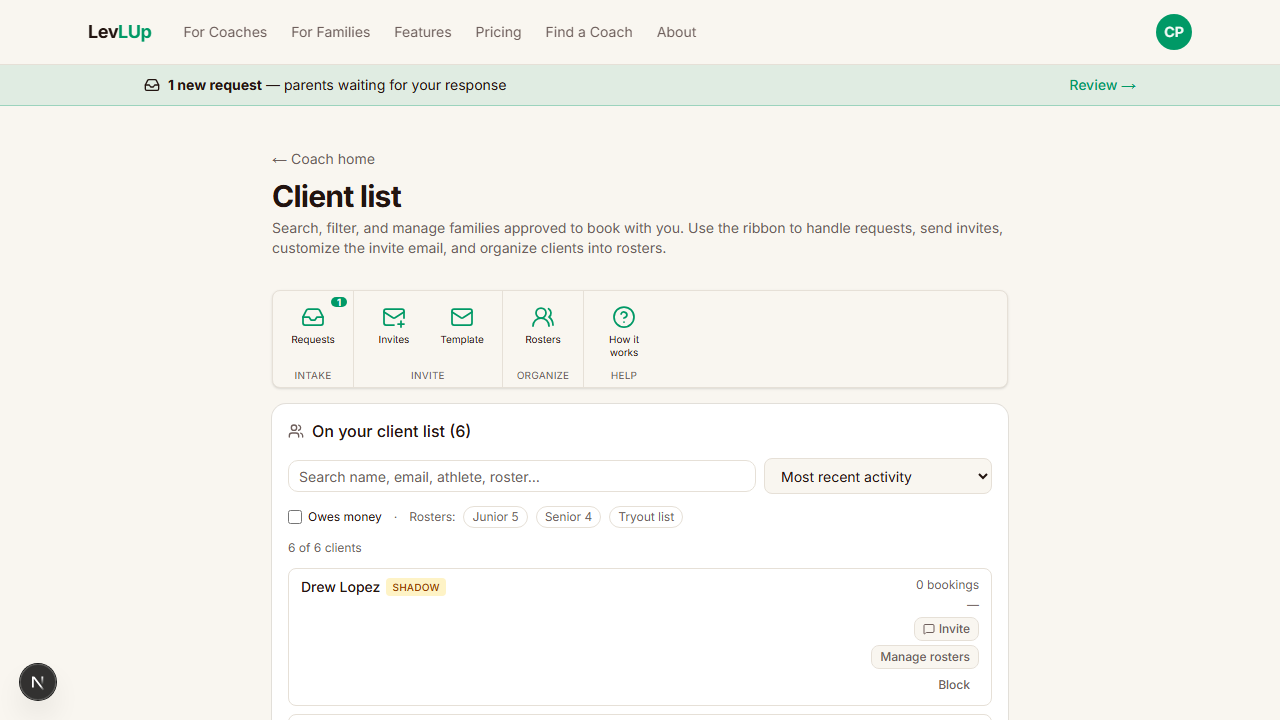
Click Invites in the ribbon. You'll see a sheet open from the right with two ways to add people:
- Add a contact — type their name plus an email and/or phone. This is the most flexible.
- Paste many emails — paste a batch of emails for a bulk invite (uses the email template).
That's enough to start. Why getting clients registered actually matters — and the full toolkit for adding them — is the next section.
Why your clients need to be registered (and how to make it easy)
A "client" in LevLUp is a parent account. When a parent is registered with you:
- They see your schedule from any phone or computer
- They book themselves into open slots (no more "is 5pm open?" texts)
- They get email confirmations with the session details
- They get an iCalendar invite that drops into their phone's calendar
- They can cancel within your cancellation window without going through you
- They get reminders automatically before each session
- You can mark payments as received and they see their balance
Without registration, you're back to doing all of that by hand.
Three paths to get a parent registered
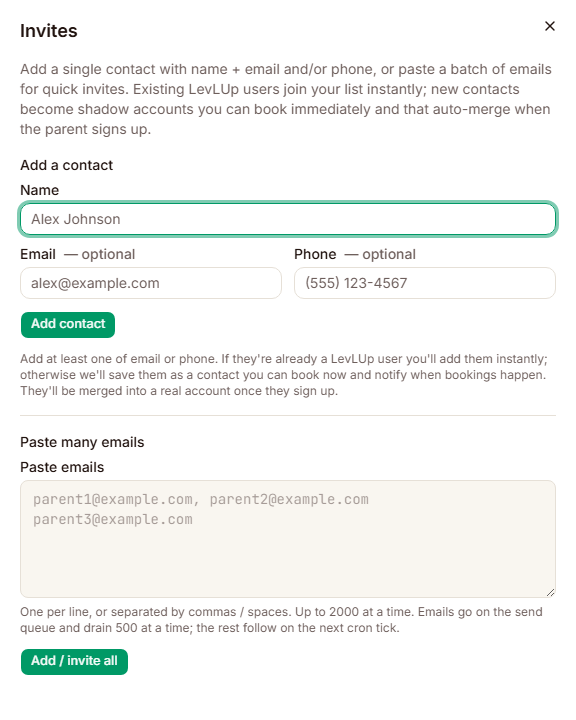
Path 1 — Add them as a "contact" (when YOU have their info)
Use this when you already have a family's name, phone, and/or email and want to seed them onto your list. Works even if they've never heard of LevLUp.
From Client list → Invites → Add a contact, type their name + email and/or phone, click Add contact.
What happens behind the scenes:
- If they're already a LevLUp parent with that email or phone → instantly on your client list
- If they're not → LevLUp creates a "shadow" account for them. You can book sessions for them right away. When they eventually sign up (with the same email or phone), their bookings transfer over automatically — no extra steps.

Path 2 — Text them a signup link from your phone (phone-only contacts)
If you added a contact with a phone number, you'll see an Invite button on their row. Click it.
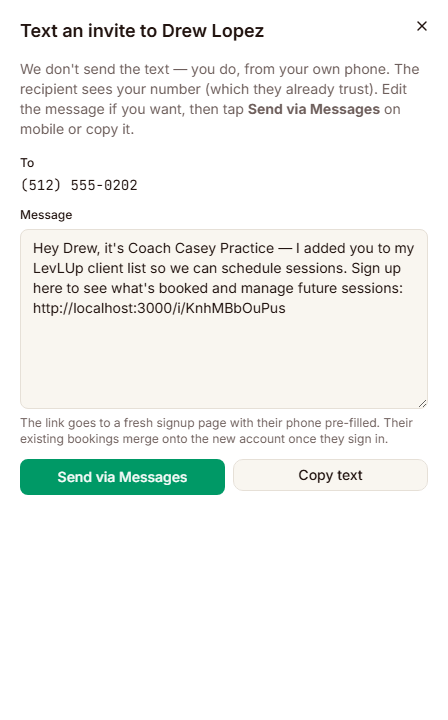
LevLUp composes a personal text from you that includes a one-tap signup link. Then:
- On your phone: tap Send via Messages. Your phone's text app opens with the recipient and message pre-filled. You just hit Send.
- On desktop: tap Copy text and paste into whatever you use to text.
Why this is the right way to invite phone-only families: the text comes from YOUR phone number — the one they already know. No spam filters. No "who is +1-855..." confusion. And LevLUp never sends unsolicited messages on your behalf, which protects both of you.
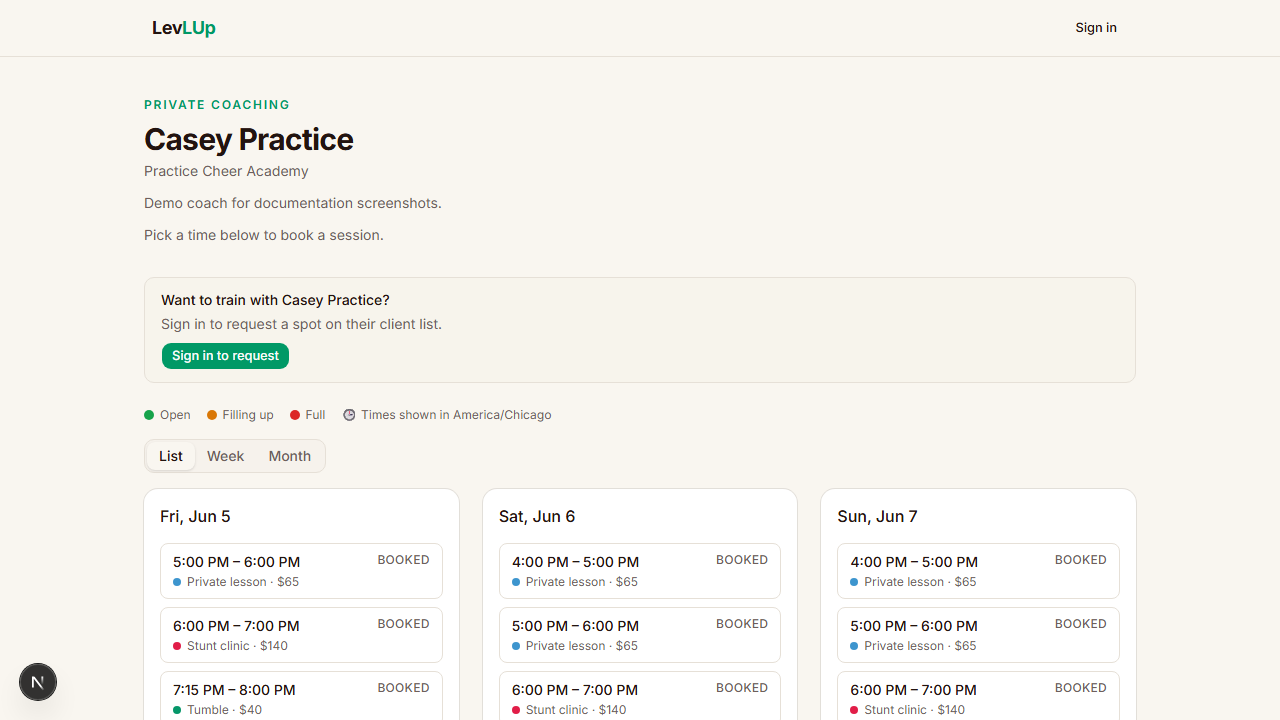
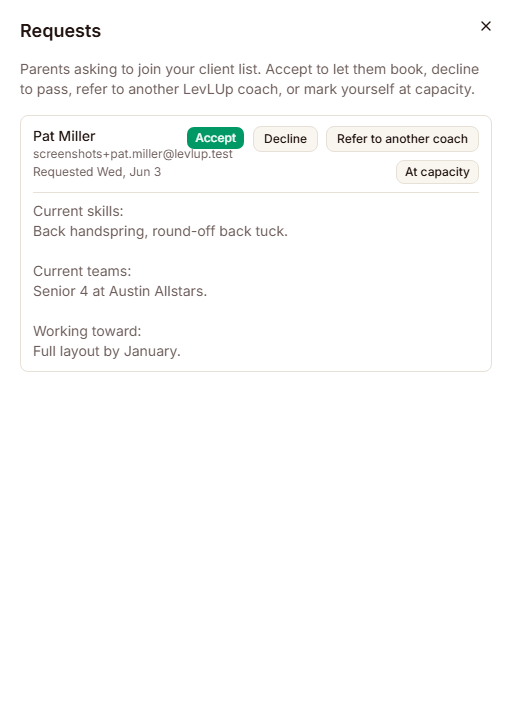
Path 3 — Let them request to schedule (your public booking page)
Every coach has a public page at levlup.pro/p/your-slug. New parents can land there and click Request to schedule, which sends you a small intake form.
Requests land in the Requests sheet (Client list → ribbon → Requests). You can:
- Approve — adds them to your list
- Decline — sends a polite "not a fit" email
- Refer — sends them to another LevLUp coach who can take them
- At capacity — canned "fully booked right now" reply
Customize the email parents receive
When you invite by email, parents get a templated message from you. To personalize it:
Client list → Invites... wait, that's the wrong tool. The template lives next to it: Client list → ribbon → Template.
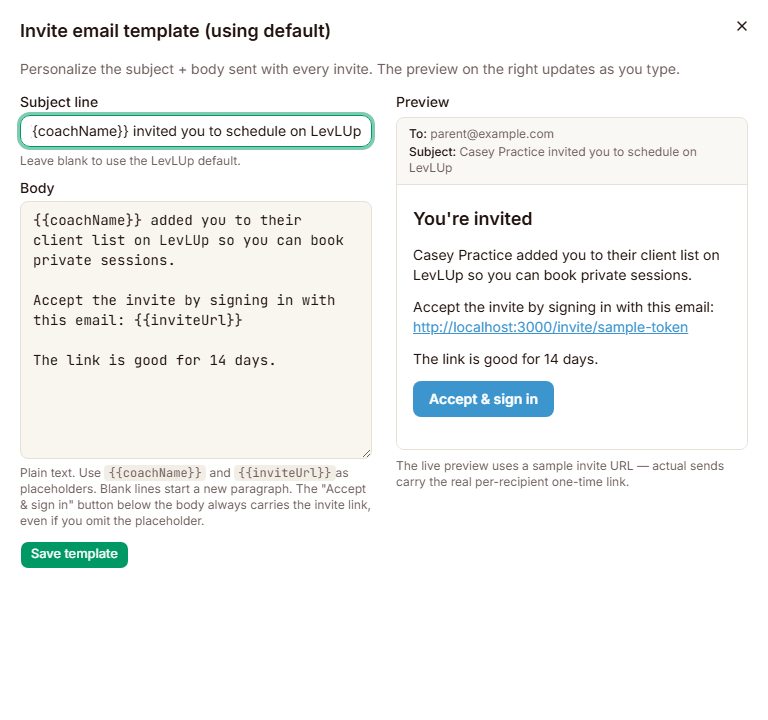
Type whatever you want. {{coachName}} and {{inviteUrl}} get replaced with real values when the email goes out. The right side shows a live preview.
Why bother: a personal note from you ("Hey, looking forward to working with your athlete — here's how I run sessions...") gets opened and acted on. The default template is fine, but five extra minutes here pays off in higher signup rates.
Day-to-day: working with your schedule
The three views
The Schedule page has three views via the tabs:
- Weekly — visual grid, see the whole week at a glance, click any slot to manage it
- List — every upcoming slot, easiest for adding athletes to specific sessions
- Monthly — calendar overview, click a slot to open its details
Adding an athlete to a slot
The most common day-to-day task. Three places to do it:
From the List view: find the slot, click Add participant on the row.
From the Weekly view: click any future slot in the grid.
From the Monthly view: click any slot to open its dialog.
All three open the same form. It has unified search — type any part of an athlete's name, parent name, email, or phone:
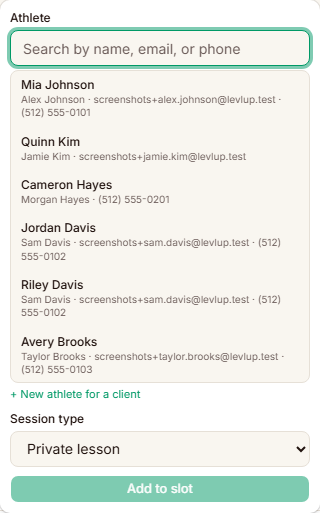
Pick the match, choose the session type, click Add to slot.
If the athlete doesn't exist yet: click + New athlete for a client. Pick the parent (any client on your list, including shadows), enter the athlete's name, click Create athlete. Then Add to slot. One flow, no detours.
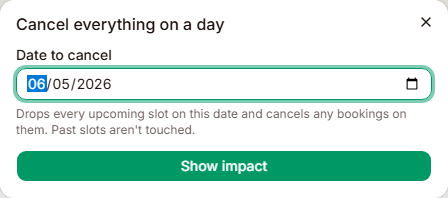
Cancel a day off
Heading out of town? Schedule → ribbon → Cancel day. Pick a date, see exactly which bookings will be cancelled (and what each family was charged), confirm. Affected families get an email + a calendar cancellation.
Bookings view (in-progress + past)
Click Bookings in the schedule ribbon to switch from the "what's scheduled" view to the "who booked what" view. This is where you mark sessions as completed, flag no-shows, and reconcile payments.
Power tools (skip until you need them)
Recurring templates
If you teach the same thing every Tuesday at 4 PM forever, set it up once as a recurring template. Ribbon → Recurring. From then on, scaffolding a new week pulls from your template.
Bundles
A bundle is a discounted package — "5-session unlimited pack" — that parents buy once and the price is set for all five sessions. Ribbon → Bundles. Bundles get offered to parents at the moment they're booking a regular session.
Rosters
Rosters are named groups of clients ("Junior 5", "Senior 4", "Tryout list"). Client list → ribbon → Rosters. Use them to:
- Restrict slot visibility — make some sessions only show up for the Senior 4 group
- Override session-type limits per group — Elite kids can book unlimited tumbling, beginners can book twice a week

Calendar sync
Ribbon → Cal sync. Generates a private URL you can subscribe to from Google Calendar, Apple Calendar, or Outlook. Every booking shows up on your personal calendar automatically. Read-only — changes have to happen in LevLUp.
Getting paid
LevLUp doesn't process payment. You collect via Venmo or Zelle on your existing account; LevLUp tracks who paid.
Every booking gets a short payment code (like MX7Q) that the parent puts in the Venmo memo. When you see the payment, find the booking in your Bookings view, click Mark paid.

If a booking goes past its scheduled time and isn't marked paid, the parent gets a soft reminder.
Configure your payment handles under Account → Payments so they appear in the confirmation emails to parents.
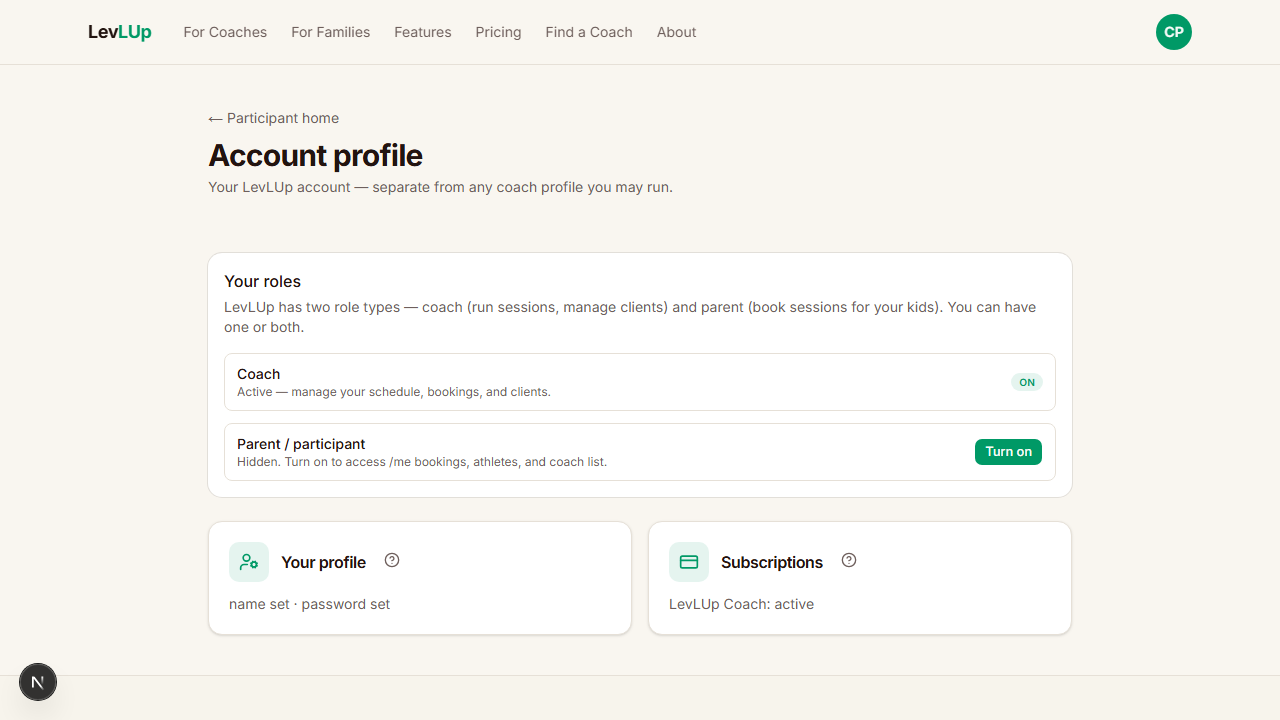
Your subscription + account
Coach home → top-right avatar → Account for:
- Profile (name, sport, club, bio)
- Subscription status + link to manage payment / cancel via Lemon Squeezy
- Payment handles (Venmo / Zelle)
- Sign out
If your subscription lapses you'll see a banner at the top of every coach page until it's renewed.
A common first-week sequence
If you're a new coach moving an existing book to LevLUp, this is the proven order:
- Settings: timezone, working hours
- Session types: build all your offerings up front
- Template: personalize your invite email (5 minutes — pays off)
- Client list: add 5-10 contacts you know best
- Try the system on yourself — book yourself a fake session to see what a parent sees
- Schedule: scaffold next week's drafts, publish or schedule release
- Send invites — text phone-only contacts from your phone, email the rest
- Once families start signing up: post your public booking page link (
levlup.pro/p/your-slug) on Instagram / in your gym's parent group
By the end of week one, the back-and-forth-via-text-for-scheduling problem is mostly gone.
Need help?
Every tool on every page has a small help icon (the ? next to the section header or in the ribbon's Help group). Tap it for an explanation specific to that tool.
For things this guide doesn't cover, email support@levlup.pro.
Screenshot capture notes (for whoever is producing this doc)
Each > 📸 **Screenshot:** marker is a placeholder waiting for a real image. To produce them generically:
- Run LevLUp on a test coach account (suggested: "Coach Casey Practice" with a few fake clients like "Alex Johnson", "Sam Davis", "Riley Lee")
- Use a clean browser window at 1280×800 — fits typical doc display widths
- Capture only the relevant card/sheet, not the whole browser chrome
- Save under
docs//coach-guide-images/with the filename shown in each placeholder (e.g.01-coach-home.png,02-schedule-ribbon-settings.png, etc.) - PNG format, 2× DPI if possible for retina-quality reading
If a screenshot would show real client information, scramble names or use the test account first.